top of page
Home
About Us
Programme
Competition Winners
Product & Still Life Mono 2025/2026
Action and Macro 2025/2026
Nature 2025/2026
Open 2025/2026
Annual Exhibition 2025
Triptych 24/25
Long Exp & Multiple Exp 24/25
Portrait 24/25
Reflections 24/25
Nightime 24/25
Street & Creative 24/25
Nature 24/25
Historical Records
Members' Galleries
David Baron
Danni Burgess
James Grimmitt BPE*2
Andy Hoyle
Massimiliano Malisan CPAGB
Jerry Marriner
Mary Marshall
Margaret Purkis
Kay Roxby
Richard Sells CPAGB BPE*2 EFIAP
Les Smart
Keira Thorogood CPAGB
Claire Wilson Sharp
Stephen Tonkin
Community
Come Fly Away Dress Rehearsal
Band Photography
Otley Carnival 2024
Otley Common
9 - 5 Dress Rehearsal
9 - 5 Studio Shots
Leeds Warriors Ice Hockey
The Wedding Singer
Mos Eisely Misfits 2024
Blog
Members Only
Competition Entries
Book Online
Website Updates
Document Library
OCC Image Processing
Online Recordings
Darkroom Home
Learning Zone
Photography
More
Use tab to navigate through the menu items.
YouTube
Channels
f64 Academy
Play Video
Play Video
16:38
Why Your Glows Look Fake (Fix It With Channels)
Download the Action here: https://f64.me/channels Learn more about the Channels: https://f64elite.com/channels/ In this video, I’m using Photoshop’s new Clarity and Dehaze controls to create a controllable “hazy atmosphere” effect that blends naturally. The problem with Clarity/Dehaze inside Photoshop is that they can feel like a hammer, so I’ll mask them using the Green channel for balanced separation, then soften and contain the effect with mask feathering and Levels. You’ll see how this creates an “Orton-style” glow without the smeary look, plus how to fine-tune it with opacity, mask feather, Levels on the mask, and a clipped Curves layer to control exactly where the glow lives (highlights vs shadows) and even add subtle color shaping. Download the free action, try it on your images, and let me know in the comments where you’d use this effect (landscapes, portraits, weddings, fine art) Chapters: 00:00 - Intro to Dehaze and Clarity 00:36 - The Problem with Clarity & Dehaze 01:26 - Intro to Channels 02:00 - Channels as Mask Maps 02:56 - A BETTER way to use Dehaze and Clarity 04:54 - Channel Masked Dehaze 05:52 - Blending the Effect 06:30 - Blooming the Effect 07:14 - Tightening the Effect 07:57 - Modifying the Effect 10:31 - The Action I made for YOU! 11:53 - Why are we doing this anyway? 13:03 - More with the Action 16:03 - What are you waiting for?
Play Video
Play Video
08:35
NEVER be afraid of Photoshop masking again!
Learn More Here: https://f64elite.com/channels/ Channels in Photoshop, scary, right? I know, I know, I know. You don't even want to go there. They can be incredibly difficult to understand, and most people will avoid them completely. But I will say, your images may suffer if you do. I made a course to make channels a lot easier to understand, and it's available today!!! Key Concepts you will learn in this course: • Read channels as mask maps (not literal RGB). • Pull clean selections straight from channels. • Refine masks for natural transitions. • Go beyond luminosity masks (sky, foliage, highlights, atmosphere… no limits here) • Build advanced masks with Calculations. • Use Apply Image to isolate color data intentionally. • Develop a repeatable experimentation workflow. ____________________________________________ Do you like the videos I make on YouTube? Want to grow your photography exponentially? 1. Subscribe! Subscribers see the content first and are the most likely to succeed in Photoshop 2. Head to the f.64 Academy website and get registered on my subscriber list. I deliver all kinds of extra tips and subscriber-only live events! https://f64academy.com/sign-up/ 3. Become an Elite Member! I take Photoshop to levels you will never see on YouTube for the members of f.64 Elite with courses, critique sessions, members-only events, a community forum, and big discounts on my most premium courses. http:/www.f64.co/elite
Play Video
Play Video
49:07
After the Edit: How Art Finds Buyer
Learn More About TASA: https://f64.co/TASA2026 Most artists stop at the edit. File saved • Image looks great • Post it • Hope it sells But that’s not how art finds its buyer. I had a conversation recently with my good friend Jason Matias, the mastermind behind The Art of Selling Art, that dug into the part no one really talks about: • Why effort doesn’t justify price • Why “I like this” means almost nothing • Why most artists don’t actually have a sales problem: they have an audience problem • And why the story behind the work matters more than the hours you put into it We also discussed your ideal buyer and where you should be selling your art. The edit is only half the job, or even less sometimes. If you’ve ever wondered why good work doesn’t automatically move… this event is for you. You're in for a treat, Jason shares a cornucopia of valuable information! Chapters: 00:00 Introduction 00:28 Who is Jason Matias? 02:06 When you edit do you have the buyer in mind? 04:20 What does editing time look like? 06:40 One Shot versus building the composition 08:15 Does the editing style influence the sale? 11:34 How important is VISION in Art Sales? 13:58 What is an Avatar? 19:16 The 5% Rule 20:37 Does the medium inform the sale price? 22:56 When art struggles to sell what is the issue? 26:25 Should style be honed before starting the sales process? 29:16 How do you go from being the creator to the communicator? 31:53 Do you compartmentalize the process? 34:16 The buyer gets a piece of you. 36:39 How do you move from a "like" to a sale? 40:48 How do you get to confidence? 46:02 Where you can I find more from Jason? ____________________________________________ Do you like the videos I make on YouTube? Want to grow your photography exponentially? 1. Subscribe! Subscribers see the content first and are the most likely to succeed in Photoshop 2. Head to the f.64 Academy website and get registered on my subscriber list. I deliver all kinds of extra tips and subscriber-only live events! https://f64academy.com/sign-up/ 3. Become an Elite Member! I take Photoshop to levels you will never see on YouTube for the members of f.64 Elite with courses, critique sessions, members-only events, a community forum, and big discounts on my most premium courses. http:/www.f64.co/elite
Play Video
Play Video
11:34
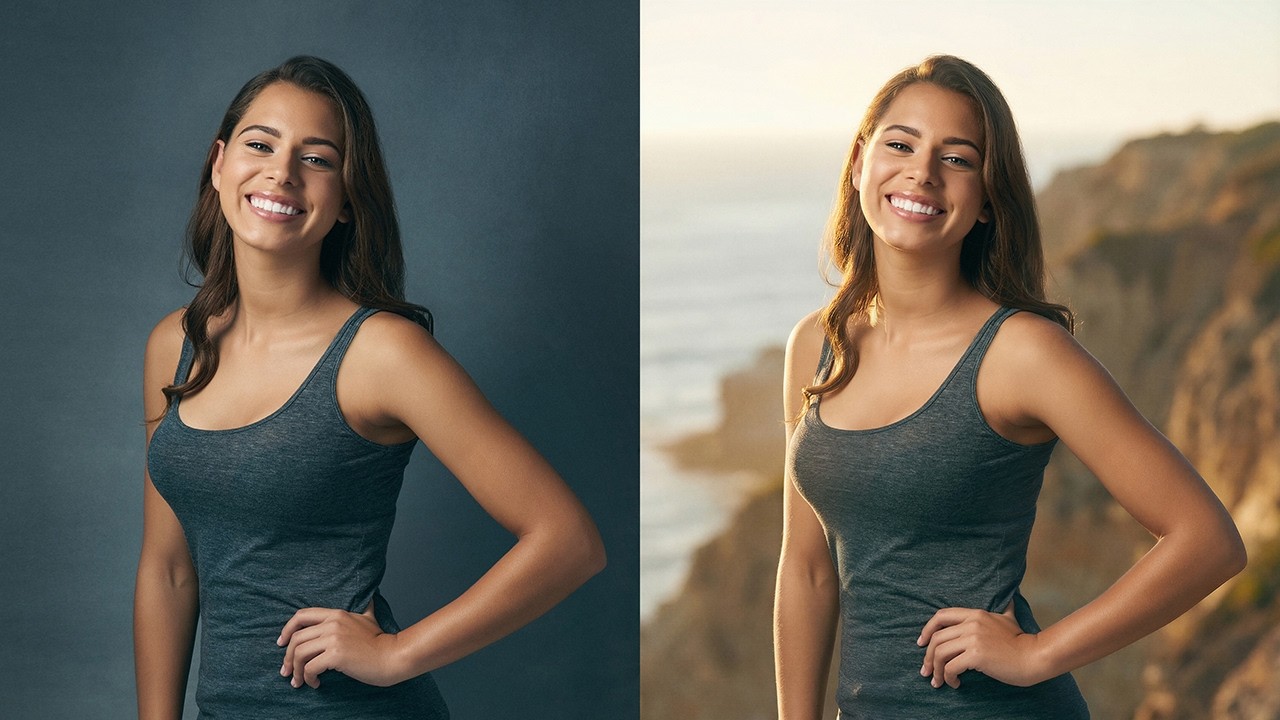
Clarity and Dehaze for DEPTH - Not CRUNCH
Link to the Grain Video: https://youtu.be/cQIwWVErP7k Clarity and Dehaze are powerful tools—but when they’re pushed too far, they flatten depth, destroy atmosphere, and make images feel crunchy instead of dimensional. In this video, I walk through best practices for using Clarity and Dehaze inside Photoshop—not to manufacture texture, but to reinforce depth, air, and spatial separation. We’ll look at why heavy-handed use feels wrong, how the eye reads contrast and distance, and how to use these adjustments more intentionally for realistic, immersive images. This isn’t about banning strong edits. It’s about understanding when clarity helps, when it hurts, and how to use it to support the story your image is trying to tell. Chapters 00:00 Why Clarity & Dehaze go wrong 01:25 What Clarity vs Dehaze actually does 04:11 Using masks to control depth 05:49 Why “crunchy” images feel flat 06:53 Using less clarity for atmosphere 07:50 Blend Modes and Dehaze ____________________________________________ Do you like the videos I make on YouTube? Want to grow your photography exponentially? 1. Subscribe! Subscribers see the content first and are the most likely to succeed in Photoshop 2. Head to the f.64 Academy website and get registered on my subscriber list. I deliver all kinds of extra tips and subscriber-only live events! https://f64academy.com/sign-up/ 3. Become an Elite Member! I take Photoshop to levels you will never see on YouTube for the members of f.64 Elite with courses, critique sessions, members-only events, a community forum, and big discounts on my most premium courses. http:/www.f64.co/elite
Play Video
Play Video
08:43
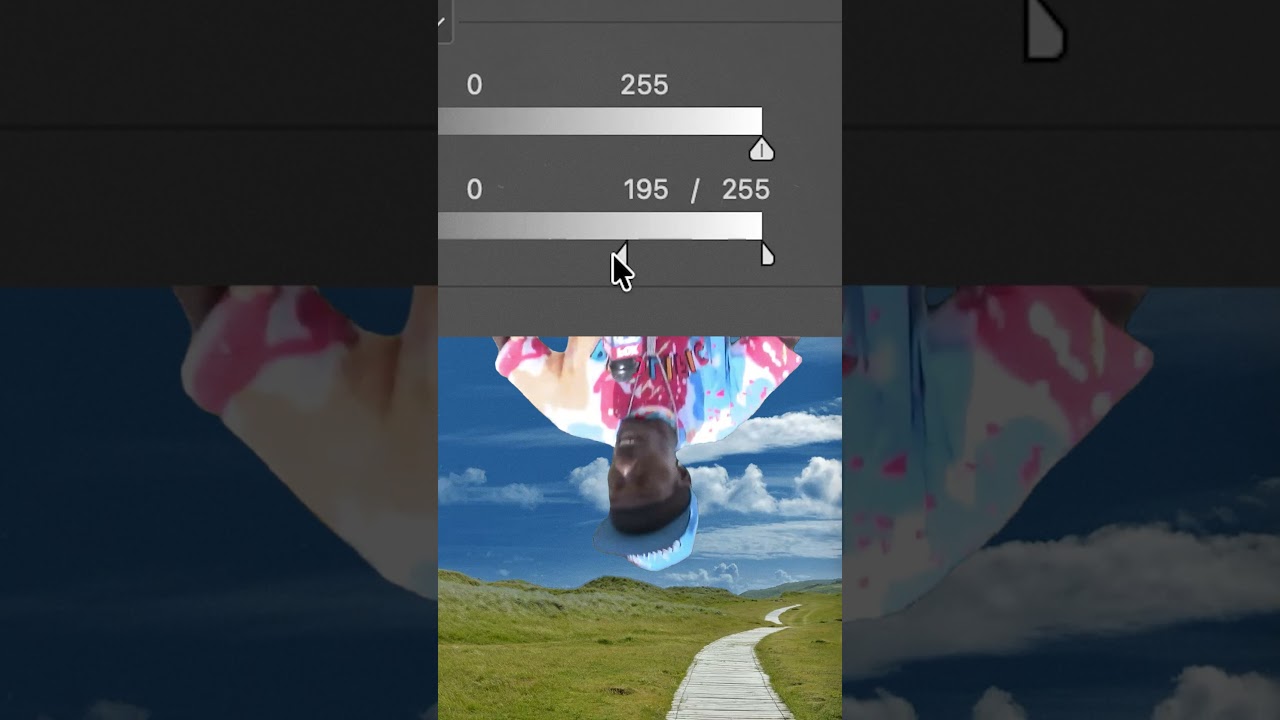
Realistic Film Grain in Photoshop
Blend If- Learn More ► https://f64.co/Blend-If-Panel The companion Clarity Video: https://youtu.be/fDRsZQ3-lQ4 Film grain isn’t noise, and it isn’t a slider you just crank up and hope for the best. In this video, I walk through what film grain actually is, where it comes from in traditional darkroom printing, and how to apply it realistically in Photoshop. We’ll look at why grain belongs in midtones and shadows, why it shouldn’t live in paper whites, and how to use Blend If to make grain fall off naturally just like it did in the analog world. Chapters 00:00 Why digital grain often looks wrong 01:38 The Film Grain Adjustment Layer 03:46 Understanding grain placement in prints 04:39 Why grain shouldn’t be in highlights 05:47 Using Blend If for realistic grain falloff 07:33 Blend If Made Easy! ____________________________________________ Do you like the videos I make on YouTube? Want to grow your photography exponentially? 1. Subscribe! Subscribers see the content first and are the most likely to succeed in Photoshop 2. Head to the f.64 Academy website and get registered on my subscriber list. I deliver all kinds of extra tips and subscriber-only live events! https://f64academy.com/sign-up/ 3. Become an Elite Member! I take Photoshop to levels you will never see on YouTube for the members of f.64 Elite with courses, critique sessions, members-only events, a community forum, and big discounts on my most premium courses. http:/www.f64.co/elite
Load More
Julieanne Kost
Play Video
Play Video
12:37
Intro to Image-to-Video in Adobe Firefly
In this Introduction to Image to Video in Adobe Firefly, Julieanne demonstrates how to transform still images into visually engaging videos. You’ll learn how to choose the right model, use first and last frames to guide motion, incorporate reference images, and make edits to refine your results. Along the way, Julieanne also provides several examples to help you understand the possibilities and confidently start creating your own animated videos. For information about credits: https://helpx.adobe.com/creative-cloud/apps/generative-ai/generative-credits-faq.html Additional tips, tricks, and tutorials from Julieanne Kost can be found on her blog: https://jkost.com/blog Facebook: https://facebook.com/julieannekost Twitter: https://twitter.com/julieannekost Instagram: https://instagram.com/jkost/ Behance: https://behance.net/julieannekost
Play Video
Play Video
10:58
Intro to Prompt-To-Edit in Adobe Firefly
In this video, Julieanne walks through the Prompt to Edit feature in Adobe Firefly. She explains how to choose the right model, craft an effective prompt, and decide when it’s best to edit a rendered image versus starting fresh with a new prompt. Along the way, she shares practical examples to help you better understand your options and get the results you’re looking for. For information about credits: https://helpx.adobe.com/creative-cloud/apps/generative-ai/generative-credits-faq.html Additional tips, tricks, and tutorials from Julieanne Kost can be found on her blog: https://jkost.com/blog Facebook: https://facebook.com/julieannekost Twitter: https://twitter.com/julieannekost Instagram: https://instagram.com/jkost/ Behance: https://behance.net/julieannekost
Play Video
Play Video
12:57
Introduction to Prompting in Adobe Firefly
In this Introduction to Prompting with Adobe Firefly, Julieanne shares a simple framework to help you turn your ideas into clear prompts for generative AI. You’ll see how giving specific, thoughtful direction can make your results more accurate and predictable. I’ll walk you through three easy steps: set the overall direction, describe the important details, and protect what shouldn’t change—so you can confidently guide your edits and get the results you want. For information about credits: https://helpx.adobe.com/creative-cloud/apps/generative-ai/generative-credits-faq.html Additional tips, tricks, and tutorials from Julieanne Kost can be found on her blog: https://jkost.com/blog Facebook: https://facebook.com/julieannekost Twitter: https://twitter.com/julieannekost Instagram: https://instagram.com/jkost/ Behance: https://behance.net/julieannekost
Play Video
Play Video
06:05
New Adjustment Layers in Photoshop - Clarity & Dehaze and Grain
In this video Julieanne demonstrates when to use Clarity, Dehaze, and Grain to increase or decrease edge contrast, add or subtract atmospheric perspective, and create structure through grain to seamlessly blend layers. Additional tips, tricks, and tutorials from Julieanne Kost can be found on her blog: https://jkost.com/blog Facebook: https://facebook.com/julieannekost Twitter: https://twitter.com/julieannekost Instagram: https://instagram.com/jkost/ Behance: https://behance.net/julieannekost
Play Video
Play Video
08:00
The Recommended Order for AI Edits in Lightroom Classic
In this video, Julieanne explains the recommended order for applying AI-powered edits in Lightroom Classic to help you work more efficiently and avoid unnecessary reprocessing. You’ll learn when to use Denoise, Remove, Lens Blur, and AI masking so your edits stay flexible, accurate, and frustration-free. Additional tips, tricks, and tutorials from Julieanne Kost can be found on her blog: https://jkost.com/blog Facebook: https://facebook.com/julieannekost Twitter: https://twitter.com/julieannekost Instagram: https://instagram.com/jkost/ Behance: https://behance.net/julieannekost
Load More
Terry Lee White
Play Video
Play Video
02:10
A 1st Look at the NEW Aqara U400 Smart Lock featuring UWB
The Aqara U400 supports UWB (Ultra Wide-Band) to automatically unlock when you approach with your phone still in your pocket.
Play Video
Play Video
00:12
Trying out the NEW Aqara U400 with UWB unlocking upon approach!
I’m doing a blog post where I’m reviewing the NEW Aqara U400 which supports UWB (Ultra Wide-Band) unlocking. No need to pull out a phone or watch. Leave them in your pocket. This lock will automatically detect them upon approach. Here’s my affiliate link for the Aqara U400 https://amzn.to/3OM36d0
Play Video
Play Video
06:06
Story Time: Rescuing 800 Unedited Event Photos for a Panicking Friend
Hey everyone! I’ve got a quick photography story for you today. A friend of mine recently hosted an event, and the photographer just handed him over 800 completely unedited RAW files straight off the memory card. When he looked at them, all the indoor shots were completely yellow due to a white balance issue, and he was panicking about how to fix so many photos.Naturally, I told him, "Don't worry, I got you". Since these weren't my photos, I didn't want to import 800 massive files into my Lightroom Classic catalog just to delete them later. Instead, this was the perfect excuse to use the new Local tab in Lightroom Desktop.In this video, I walk you through exactly how I helped him out. I show you how I browsed the folder locally, instantly fixed the white balance using the eyedropper tool, applied an adaptive color profile, and added a touch of manual denoise. The best part? I copied those exact settings and batch-pasted them across all 800 photos while I walked away. After a quick export to JPEG, I was able to hand my friend a folder of perfectly edited images ready for social media and prints. 🔔 Subscribe for more tips! 👍 Like if you found this helpful & Comment with your questions! Follow me on social media: https://terryleewhite.social
Play Video
Play Video
16:06
What's NEW in the February 2026 Lightroom Updates?
In this video, I break down the latest updates across the Lightroom ecosystem. I’ll show you updates to the new "Assisted Culling" feature in early access for both Lightroom Classic and Lightroom Desktop, designed to help you quickly identify photos that are in focus and ensure subjects' eyes are open. We also dive into new Generative AI integrations, including how to generate video from a still image using Firefly and how to fix group shots—like opening closed eyes—by sending photos directly to Firefly for editing. Finally, I demonstrate the new Generative upscale using Topaz Gigapixel feature to increase resolution while maintaining quality and cover performance improvements for Mobile and Classic users. Topics Covered: Assisted Culling in Lightroom Classic & Desktop (Early Access) Generating Video from Still Images with Firefly Fixing Photos with Firefly (Generative Edit) Generative upscale with Topaz Gigapixel Lightroom Mobile & Performance Updates Generative Credits Update With the expansion of these AI features, there’s also an update to monthly credits: Lightroom 1TB plan now includes 250 credits per month Lightroom Teams plan gets: 500 per month if you joined before June 17, 2025 250 per month if you joined after June 17, 2025 Photography Plan (1TB) now includes 1000 credits per month Credits can be used across Lightroom, Photoshop, and Firefly. If you’re using generative tools regularly, this gives you more room to test things without immediately worrying about running out. 🔔 Subscribe for more tips! 👍 Like if you found this helpful & Comment with your questions! Follow me on social media: https://terryleewhite.social
Play Video
Play Video
09:36
Top 7 New Lightroom Innovations + Exclusive Sneak Peek!
I’m diving into my top favorite innovations across Lightroom and Lightroom Classic from the past year. From AI-powered culling to a brand-new generative tool coming soon, these updates are game-changers for your photography workflow. In this video, I cover: • AI Denoise: High-level noise reduction with post-processing slider control. • Assistant Culling: Automatically eliminate out-of-focus shots and closed eyes in large portrait sessions. • Distraction & Dust Removal: Magic AI tools to clean up reflections and sensor spots instantly. • Landscape Masking: New category to automatically identify sky, mountains, architecture, water, and vegetation. • Adaptive Color Profiles: Intelligent color and B&W enhancements. • Photoshop Integration: How to open multiple images directly as layers for quick compositing. • SNEAK PEEK – Generative Upscale: A first look at the upcoming Topaz Gigapixel-powered 4x upscale tool! CHAPTERS 00:00 - Intro 00:21 - AI Denoise 01:10 - Assisted Culling 02:39 - Reflection Removal 03:14 - AI Dust Removal 04:06 - Landscape Masking 05:11 - Adaptive Color Profiles 05:51 - Lr to Photoshop as Layers 06:54 - SNEAK PEEK - Generative Upscale 08:41 - Wrap Up I also touch on some honorable mentions, including Quick Actions for iPad and improved tethered shooting for Leica and Nikon users. Check out these innovations and let me know in the comments which one is your favorite! 🔔 Subscribe for more tips! 👍 Like if you found this helpful & Comment with your questions! Follow me on social media: https://terryleewhite.social
Load More
Steve Perry
Play Video
Play Video
01:33
Your Lens Isn’t Soft - The AIR Is Ruining Your Sharpness! #wildlifephotography #birdphotography
If your photos look soft even when focus and camera settings are correct, your lens may not be the problem. Heat haze and atmospheric distortion can reduce sharpness before light ever reaches your camera sensor. In this short, wildlife photographer Steve Perry explains how heat haze works, why long lenses are especially affected, and why autofocus settings, shutter speed, or expensive gear cannot fix atmospheric distortion. Learn how air temperature differences cause refracted light, why distant subjects lose detail, and what photographers can do in the field to improve sharpness when shooting wildlife, birds, sports, or distant subjects. Topics covered include: heat haze photography atmospheric distortion soft images with telephoto lenses wildlife photography sharpness bird photography tips long lens image quality why photos look soft despite correct focus
Play Video
Play Video
21:00
Bird in Flight Photography: The Mirrorless Settings & Techniques That Actually Work
Bird in flight photography is one of the hardest skills in wildlife photography, but the right setup and technique can dramatically increase your keeper rate. In this updated crash course, I walk through the mirrorless settings and field techniques I use to consistently capture sharp, dynamic birds in flight. If your bird-in-flight photos feel hit-or-miss, you’re not alone. Modern mirrorless cameras have changed how autofocus, exposure, and shooting technique work, and many older tutorials no longer reflect how today’s systems perform. In this video, I cover the essential settings and real-world techniques that help wildlife photographers consistently improve their bird-in-flight results, including: • The shutter speeds that maximize sharpness • How aperture affects focus forgiveness and background quality • Autofocus strategies for modern mirrorless cameras • Subject detection tips and common AF traps • Takeoff timing and tracking technique • Wind direction and positioning for better flight angles • Frame rate, stabilization, and gear setup tips Whether you’re new to bird photography or looking to improve your keeper rate, this video is designed as a practical starting point you can apply immediately in the field. Links: Bird In Flight Book: https://bcgwebstore.com/product/secrets-to-stunning-bird-in-flight-photography/ Related Videos: Highlight Weighted Metering: https://youtu.be/KLyxfJmaoz8 Pre Capture Crash Course: https://youtu.be/3zBW8kI0rVY Nikon Focus Limiter Setting: https://youtu.be/ZG-V6lYG_eY Nikon AF Handoffs: https://youtu.be/KKROz0M05WE Find Your Subject With A Long Lens: https://youtu.be/frLDd1_TO0o Culling Large Numbers Of Images: https://youtu.be/-jvw6wBHklI How TO Balance A Gimbal Head: https://youtu.be/OWAzwWOaXwc Attributions: Select animations by Brandon Harwood rocket report and scream jr.wav by cognito perceptu -- https://freesound.org/s/32983/ -- License: Creative Commons 0 Bird model and wing flap animation by ahitch3 https://skfb.ly/oAOSw additional animations by Brandon Harwood
Play Video
Play Video
12:29
Why I Shoot 40-50% of My Wildlife Photos with the LCD (And How)
Are you still shooting everything through the viewfinder? You might be missing out. In this video, I break down how I use the rear LCD screen for 40–50% of my wildlife photography and why it has completely changed the way I approach low-angle and creative compositions. Shooting from the LCD isn’t just about convenience. It’s about unlocking perspectives that are impossible or uncomfortable through the viewfinder. Whether you’re photographing birds at ground level, wildlife from a boat, animals in trees, or trying to shoot over obstacles, the rear LCD gives you angles that simply aren’t practical otherwise. But there’s a catch. There’s a steep learning curve. In this video I walk you through: • The best autofocus settings for LCD shooting • Why subject detection and full-frame AF areas make this easier • Nikon Auto Area AF, Sony Wide AF, Canon tracking modes, Nikon 3D tracking • Back button focus vs shutter release focus with the LCD • Why image stabilization helps even at fast shutter speeds • How to find your subject quickly without “searching” • The rifle barrel alignment trick • Why you should start at your widest focal length • Teleconverter disengage and reengage strategy • How to compose looser to avoid clipping • Pre-focusing shortcuts • Using Pre-Capture for action moments • Practical shooting techniques for wildlife and birds If you’ve ever tried using the rear screen and felt frustrated, this video will shorten your learning curve dramatically. Whether you shoot Nikon, Sony, or Canon mirrorless cameras, these techniques apply across brands. Once you get comfortable with LCD shooting, you’ll open up a whole new world of creative wildlife photography angles that most photographers never even attempt. If this helps, hit like and subscribe for more wildlife photography field techniques, autofocus tips, and real-world shooting strategies. Linktree: https://backcountrygallery.com/linktree/ #WildlifePhotography #BirdPhotography #MirrorlessPhotography #NikonZ9 #SonyAlpha #CanonR5 #RearLCD #PhotographyTips #AutofocusTips #SubjectDetection #BackButtonFocus #PreCapture #LowAnglePhotography #NaturePhotography #PhotographyEducation
Play Video
Play Video
01:29
Are Ears the Secret to Better Wildlife Photos? #shorts #wildlifephotographytips #mammals
Most people are taught to focus on the eyes in wildlife photography. Almost nobody talks about the ears. But ear position is one of the strongest emotional cues in an animal photo. Ears forward makes a subject feel curious, alert, and connected to the viewer. Ears pinned back usually read as stress, irritation, or defensiveness. And everything in between can either add character or make the subject feel disengaged, depending on the rest of the body language. If you want stronger wildlife portraits, do not just watch the eyes. Watch the ears too. This one small change can dramatically improve the emotional impact of your images.
Play Video
Play Video
14:07
10 Habits That Will Instantly Improve Your Wildlife Photography
If you want better wildlife photos, it’s rarely about buying new gear. The biggest improvements come from building better habits in the field. In this video, I break down 10 habits that instantly improve wildlife photography, whether you’re photographing birds, mammals, or anything in between. These aren’t tricks, presets, or camera hacks. They’re field-proven wildlife photography habits that raise your baseline and make you more consistent every time you lift the camera. We’ll cover things like: • A habit you should do with your settings every time • Leveraging the rear LCD for more impact • How to get more emotional wildlife photos • What to look for and avoid in backgrounds before pressing the shutter • How to catch peak moments • When to shoot environmental wildlife images - and when not to • Using backlight and rim light for dramatic wildlife photos • Moving beyond field-guide style images • Leveraging underused camera features for wildlife photography • Spending more time in the field to build real photographic skill These are the same habits I use in real wildlife photography situations and teach in my workshops. You don’t need to master all ten at once. If you commit to even a few of these wildlife photography field habits, you’ll start seeing better results almost immediately. Whether you’re looking to jumpstart your wildlife photography this year or you just feel like you’ve hit a plateau, these habits will help you shoot more intentionally, anticipate better moments, and come home with stronger images. New to wildlife photography or looking to improve bird photography, animal photography, or nature photography? These habits apply across all genres of wildlife work. #wildlifephotography #wildlifephotographytips #wildlifephotographer #birdphotography #naturephotography #photographyhabits #photographytips #naturephotographer #animalphotography #wildlifephotos Other videos: Backgrounds: https://youtu.be/4_KH-j0KO9c Histograms: https://youtu.be/KLyxfJmaoz8 Pre-Capture : https://youtu.be/3zBW8kI0rVY Linktree: https://backcountrygallery.com/linktree/
Load More
Photoshop Training Channel
Play Video
Play Video
24:25
What's NEW In Photoshop 2026 January Update
In this video, we’ll dive into everything new in Photoshop 2026 (January Release) and Photoshop Beta. 🎯 SUBSCRIBE to get more amazing Photoshop tutorials! ► https://hi.switchy.io/Subscribe-to-PTC 📘 INDEX - 00:00 - Remove Tool Model 3 01:09 - Introduction 01:16 - Dehaze and Clarity Adjustment Layer 03:27 - Grain Adjustment Layer 04:35 - Firefly Fill & Expand Model 08:44 - Generative Expand 11:47 - Reference Image in Firefly Fill & Expand 19:53 - Dynamic Text - Photoshop Beta 24:12 - Final Thoughts 🔗 LINKS: Mastering Selections and Masks ► https://courses.photoshoptrainingchannel.com/selections-masks-photoshop Premium Tutorials ► http://ptcvids.com/shop 👍 CONNECT ● TikTok ► https://www.tiktok.com/@jrfromptc ● Instagram ► http://instagram.com/photoshoptrainingchannel 📝 CREDITS ● Photoshop video tutorials by Jesus Ramirez #PhotoshopTutorial #Photoshop #PTCvids
Play Video
Play Video
07:59
Photoshop Is Now Inside ChatGPT! (Use It FREE!)
You can now edit your images using Photoshop inside ChatGPT! In this video, you will learn how to activate Photoshop in ChatGPT and apply adjustments and effects to your photos. 🎯 SUBSCRIBE to get more amazing Photoshop tutorials! ► https://hi.switchy.io/Subscribe-to-PTC 📘 INDEX - Photoshop Inside ChatGPT 00:00 - Introduction 00:19 - Activate Photoshop in ChatGPT 00:52 - Add a Photo To Edit in ChatGPT 01:31 - Make the Background Black and White in ChatGPT 02:40 - Change The Color of an Object in ChatGPT 03:21 - Apply Photo Effects in ChatGPT 03:51 - Add the Halftone Effect 04:17 - Apply the Duotone Effect 04:53 - Remove Photoshop Effects in ChatGPT 05:49 - Add the Vibrance Adjustment in ChatGPT 06:05 - Edit ChatGPT Image in Photoshop on the Web 06:53 - List of Photoshop adjustments you can apply in ChatGPT 🔗 LINKS: Premium Tutorials ► http://ptcvids.com/shop 👍 CONNECT ● TikTok ► https://www.tiktok.com/@jrfromptc ● Instagram ► http://instagram.com/photoshoptrainingchannel 📝 CREDITS ● Photoshop video tutorials by Jesus Ramirez #PhotoshopTutorial #Photoshop #PTCvids
Play Video
Play Video
06:25
Nano Banana Pro in Firefly Boards is Insane!
Gemini 3 Nano Banana Pro is now in Photoshop! But in this tutorial, I will show you how you can take advantage of it using Adobe Firefly and Firefly Boards. 🎯 SUBSCRIBE to get more amazing Photoshop tutorials! ► https://hi.switchy.io/Subscribe-to-PTC 📘 INDEX - Nano Banana is Now in Photoshop 00:00 - Introduction 00:39 - Nano Banana Pro in Firefly 02:29 - Firefly Boards and Nano Banana Pro 🔗 LINKS: Nano Banana 2.5 Tutorial ► https://youtu.be/Db4ywOnEK74 Premium Tutorials ► http://ptcvids.com/shop 👍 CONNECT ● TikTok ► https://www.tiktok.com/@jrfromptc ● Instagram ► http://instagram.com/photoshoptrainingchannel 📝 CREDITS ● Photoshop video tutorials by Jesus Ramirez #PhotoshopTutorial #Photoshop #PTCvids
Play Video
Play Video
03:11
Adobe Finally Added The Feature I Suggested - See It In Action
Learn how to use Photoshop's NEW Hue/Saturation "Invert" button to quickly flip color selections and isolate colors faster. This feature came from my suggestion to Adobe, and in this tutorial, I'll show you exactly how it works. Plus, discover the improved Selective Color tooltips that clarify Relative and Absolute modes. 🎯 SUBSCRIBE to get more amazing Photoshop tutorials!► https://hi.switchy.io/Subscribe-to-PTC 📘 INDEX - Flip Range Sliders Button 00:00 - Introduction 00:46 - Hue Color Values 01:14 - How The New Flip Color Range Sliders Button Works 02:21 - New Selective Color Tool Tips 🔗 LINKS: 🎓Enroll in my Selections and Masking Mastery course ► https://swiy.co/Masking-Course 💾 TUTORIAL DOWNLOAD► 👍 CONNECT ● TikTok ► https://www.tiktok.com/@jrfromptc ● Instagram ► http://instagram.com/photoshoptrainingchannel 📝 CREDITS ● Photoshop video tutorials by Jesus Ramirez #photoshoptutorial #Photoshop #PTCvids
Play Video
Play Video
10:17
Flawlessly Remove Dark Eye Circles in Photoshop! [Pro Technique]
Learn a pro-level technique for removing dark circles and eye bags in Photoshop, preserving all detail and skin texture! This video will explain EXACTLY how Frequency Separation works and how I use it in my professional projects to tackle the most challenging retouching projects. 🎯 SUBSCRIBE to get more amazing Photoshop tutorials! ► https://hi.switchy.io/Subscribe-to-PTC 📘 INDEX - Remove Dark Circles Naturally 00:00 - Introduction 00:19 - Setting up Frequency Separation 04:46 - 16-Bit Settings 05:20 - Set Blending Mode 05:50 - Paint Eye Circles Away 08:23 - Additional Tips for Removing Eye Circles Premium Tutorials ► http://ptcvids.com/shop 👍 CONNECT ● TikTok ► https://www.tiktok.com/@jrfromptc ● Instagram ► http://instagram.com/photoshoptrainingchannel 📝 CREDITS ● Photoshop video tutorials by Jesus Ramirez #PhotoshopTutorial #Photoshop #PTCvids
Load More
PiXimperfect
Play Video
Play Video
00:43
How to Fix Poor Posture in Photoshop #Shorts
Play Video
Play Video
12:05
End of Real Photography?
Can AI truly replace studio photography, location photo shoots, and portrait photography as we know it? In this video, we’ll take real photos and test whether AI can place them in entirely different locations and backdrops with a seamless match of lighting, colors, and pixel-level precision. Using detailed prompts and 8K AI workflows, we’ll transform a simple studio shot into natural outdoor scenes, street photos, luxury interiors, and more, while preserving the precise original features. We’ll see what it does well and where it falls short, so you can make your own judgment about where this technology is heading and what you wish to do with it. I hope you enjoy this video. Thank you so much for watching :) ► Check out Nano Banana with Freepik: https://pix.live/freepik - Some plans have unlimited generations for certain resolutions. - You can also try Adobe Firefly, but it does not support 4K, as of recording this video. 🚀 Join PiXimperfect Pro - The Ultimate Photoshop Training Course: https://pix.live/pro ► TIMESTAMPS: 00:00 Is AI Taking Over Photography? 00:25 Transform Studio Portrait to Outdoor Shoot 01:39 Restoring Original Features in Photoshop 03:27 Fix Low Resolution with 8K Upscale 04:44 Background Replacement for Group Photos 06:50 Testing AI with Spotlight Lighting 07:41 Fixing Results with Prompt Engineering 09:33 Where AI Falls Short 10:11 AI Backdrop for Harsh Lighting 11:10 Is This the End of Real Photography? ► RECOMMENDED SOFTWARE & CREATIVE RESOURCES: ✅ Official PiXimperfect Compositing Plugin: https://pix.live/pixcomposite ✅ The Best A.I. Powered High-End Portrait Retouching Plugins: https://pix.live/retouch4me ✅ Unlimited Photoshop Actions, Plugins, Brushes, Assets, etc: https://pix.live/envato ✅ The Best Professional Plugin for Color Grading: https://pix.live/infinitecolor ✅ Try Photoshop for Free: https://pix.live/photoshop ✅ Music Used in PiXimperfect Videos: https://pix.live/music ► THE GEAR I USE: ✅ My Graphic Tablet: https://pix.live/wacompro ✅ Recommended Budget Tablet: https://pix.live/wacomlite ✅ Primary Microphone: https://pix.live/mic1 ✅ Budget Microphone: https://pix.live/mic2 ✅ Audio Interface: https://pix.live/audiointerface ✅ Camera: https://pix.live/camera ✅ Lens: https://pix.live/lens ► DOWNLOADS: High-Res Generations with PSD: https://pix.live/aibgsample ► LET'S CONNECT: Instagram: https://www.instagram.com/piximperfect Facebook: http://facebook.com/piximperfect Twitter: https://twitter.com/piximperfect
Play Video
Play Video
19:10
7 Signs You’re a Photoshop Pro (Your Scorecard)
Are you really a Photoshop Pro? Discover where you stand with your Photoshop skills, see if you relate to these 7 things real pros do! 🚀 Join PiXimperfect Pro - The Ultimate Photoshop Training Course: https://pix.live/pro In this fun video, we'll test your real Photoshop instincts, from mastering powerful keyboard shortcuts like Stamp Visible and rotating the clone source, to working non-destructively with masks and Blend If, understanding the true power of Smart Objects, using blend modes intentionally, customizing your workspace and shortcuts for speed, building and modifying your own Actions, and finally, spotting bad masks instantly like a pro. Give yourself one point for every sign that sounds like you, and by the end, you'll know exactly where you stand: Explorer, Skilled, Advanced, or truly Dangerous. Along the way, you'll not only measure your level but also pick up practical techniques you can start using immediately to level up your workflow. I hope this video helps you. Thank you so much for watching :) ► TIMESTAMPS: 00:00 The 7 Signs of a Photoshop Pro 00:44 Sign 1 03:37 Sign 2 05:16 Sign 3 08:21 Sign 4 12:26 Sign 5 14:21 Sign 6 16:03 Sign 7 17:18 Your Score, Analyzed ► RECOMMENDED SOFTWARE & CREATIVE RESOURCES: ✅ Official PiXimperfect Compositing Plugin: https://pix.live/pixcomposite ✅ The Best A.I. Powered High-End Portrait Retouching Plugins: https://pix.live/retouch4me ✅ Unlimited Photoshop Actions, Plugins, Brushes, Assets, etc: https://pix.live/envato ✅ The Best Professional Plugin for Color Grading: https://pix.live/infinitecolor ✅ Try Photoshop for Free: https://pix.live/photoshop ✅ Music Used in PiXimperfect Videos: https://pix.live/music ► THE GEAR I USE: ✅ My Graphic Tablet: https://pix.live/wacompro ✅ Recommended Budget Tablet: https://pix.live/wacomlite ✅ Primary Microphone: https://pix.live/mic1 ✅ Budget Microphone: https://pix.live/mic2 ✅ Audio Interface: https://pix.live/audiointerface ✅ Camera: https://pix.live/camera ✅ Lens: https://pix.live/lens ► LET'S CONNECT: Instagram: https://www.instagram.com/piximperfect Facebook: http://facebook.com/piximperfect Twitter: https://twitter.com/piximperfect
Play Video
Play Video
00:36
Fix Skin Tones with One Click in Photoshop #Shorts
Play Video
Play Video
00:57
Make Skies Dramatic in Photoshop! #Shorts
Load More
Nucly • Photoshop and Creative Design Tr...
Play Video
Play Video
20:49
I Reviewed Your Photoshop Composites (Honest Feedback)
In this video, I review the entries from the January and February Nucly compositing challenges and break down what’s working in each piece—and what could be improved. For every image, I go through three things: • What’s working well in the composite • What feels off or breaks the illusion • The single most important improvement I’d suggest to strengthen the piece Compositing is rarely about adding more elements. Most of the time it comes down to refining the fundamentals—light, perspective, scale, color harmony, and integration. These critiques focus on those core ideas so you can apply the same thinking to your own work. If you submitted an image, thanks for participating. The quality of these challenges keeps getting better every month. If you’d like to join the next challenge, you can do so in our Facebook group here: https://facebook.com/groups/nucly — Don’t forget to SUBSCRIBE and turn on notifications! And likes and shares help a lot too! Check out my full professional Photoshop training courses here: https://www.nucly.com/courses And all my asset packs here: https://www.nucly.com/tools — Follow me: Professional Training - https://www.nucly.com Blog - https://zevendesign.com Facebook - https://www.facebook.com/zevendesign Instagram - https://www.instagram.com/zevendesign 500px - https://500px.com/rikardrodin
Play Video
Play Video
17:58
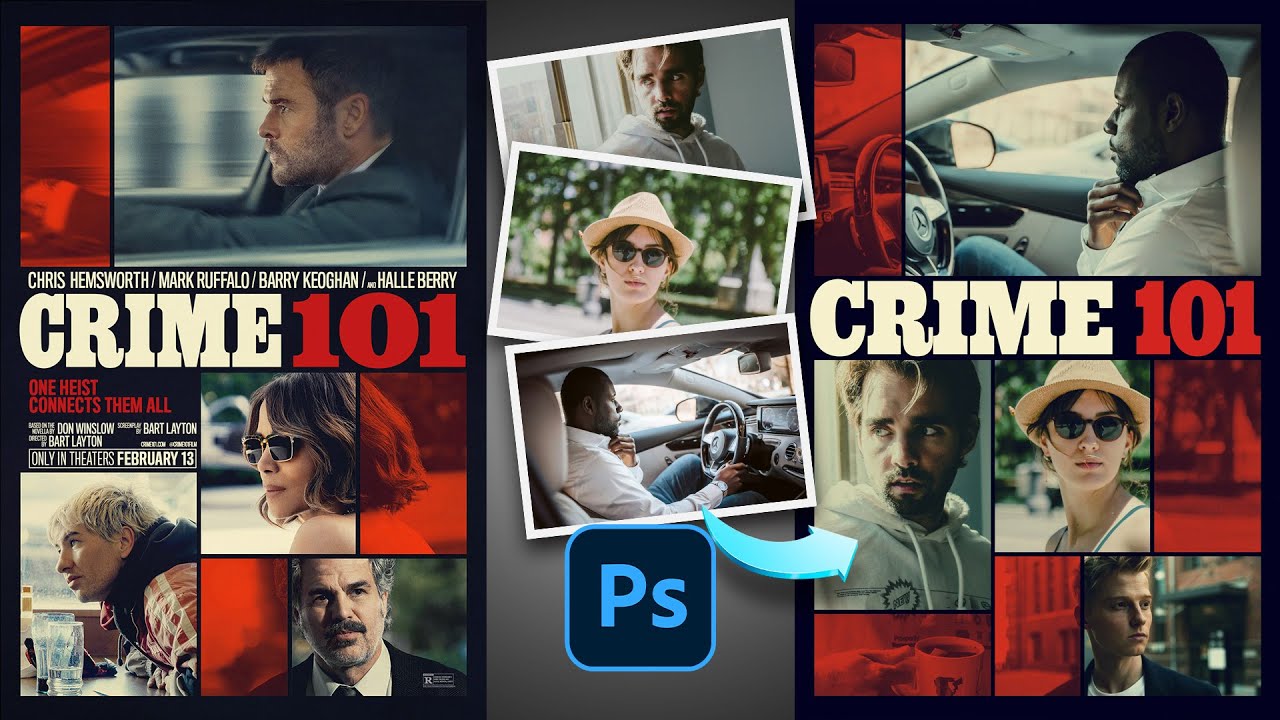
Recreate the CRIME 101 Movie Poster Look in Photoshop
Download tutorial assets here: https://nucly.com/crime-101-poster-tutorial In this tutorial, I’ll show you how to recreate the CRIME 101 movie-poster look in Photoshop using your own images. This is a great exercise in layout discipline, color control, and subtle texture—where small decisions add up to a strong, cinematic result. We’ll build the poster from the ground up, starting with a proper theatrical canvas and grid system. From there, you’ll learn how to mask and arrange multiple images cleanly, unify contrast with curves, and use a targeted gradient map to lock everything into a cohesive color palette. We’ll finish with separation lines, controlled grain, and typography that feels bold without overpowering the imagery. This workflow is practical, repeatable, and easy to adapt to your own posters, thumbnails, or promotional composites. 00:00 – 🎬 Intro & poster overview 00:00:49 – 📐 Setting up the canvas and grid layout 00:09:07 – 🖼 Importing images into the layout 00:09:48 – ✂️ Masking images into the grid 00:10:48 – 🟥 Adding black separation lines 00:11:40 – 🎨 Adding curves for contrast control 00:12:55 – 🔥 Applying the cinematic gradient map 00:14:10 – 🔠 Adding and styling the CRIME 101 text 00:15:05 – 🌫 Adding grain with Camera Raw 00:15:38 – ✅ Final polish and wrap-up Download original poster reference here: http://www.impawards.com/2026/crime_one_o_one_ver4.html Fonts used: https://fonts.google.com/specimen/Ultra — Don’t forget to SUBSCRIBE and turn on notifications! And likes and shares help a lot too! Check out my full professional Photoshop training courses here: https://www.nucly.com/courses And all my asset packs here: https://www.nucly.com/tools — Follow me: Professional Training - https://www.nucly.com Blog - https://zevendesign.com Facebook - https://www.facebook.com/zevendesign Instagram - https://www.instagram.com/zevendesign 500px - https://500px.com/rikardrodin
Play Video
Play Video
18:40
Generative AI to Graphic Design: The Primate Poster Tutorial
Download tutorial assets here: https://www.nucly.com/primate-poster-tutorial In this tutorial, I walk through the full process of recreating the Primate movie poster — starting with generative AI to create a chimpanzee wearing a T-shirt, then moving into Photoshop to build the final graphic poster design. We focus heavily on style and control, not just AI output. You’ll see how to take an AI-generated image and push it into a bold, high-contrast movie poster using Photoshop techniques that actually hold up in real design work. Topics covered: • Using generative AI to create a usable character base • Cleaning and prepping AI imagery for design • Gradient Maps for controlled color styling • Combining Difference, Hard Mix, and Linear Light blending modes • Building a gritty, graphic poster look • Typography placement and negative space for impact This is a practical workflow for designers who want to use AI without losing creative control — and avoid the “AI slop” look. — Don’t forget to SUBSCRIBE and turn on notifications! And likes and shares help a lot too! Check out my full professional Photoshop training courses here: https://www.nucly.com/courses And all my asset packs here: https://www.nucly.com/tools — Follow me: Professional Training - https://www.nucly.com Blog - https://zevendesign.com Facebook - https://www.facebook.com/zevendesign Instagram - https://www.instagram.com/zevendesign 500px - https://500px.com/rikardrodin
Play Video
Play Video
29:47
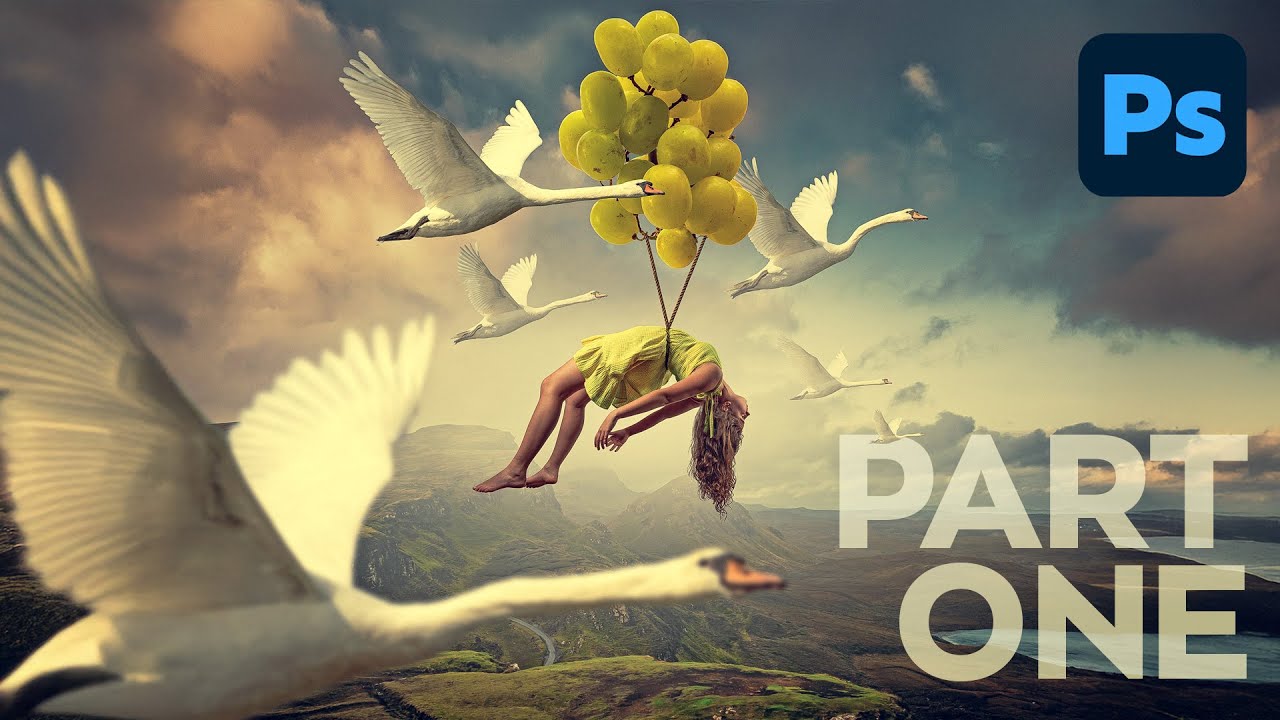
Swan Ascent Photoshop Composite Part 2
Tutorial assets → https://www.nucly.com/swan-ascent-com... Full course here → https://www.nucly.com/grape-escape Part One here → https://www.youtube.com/watch?v=kMW5lCmVcdU This project is one of the two live compositing lessons included in the Grape Escape course. Because each of these are almost an hour long, I've split it into two parts. In this second part, we turn grapes into balloons, add swans and then add some finishing touches (including a color grade) to make the whole composite feel unified. — Don’t forget to SUBSCRIBE and turn on notifications! And likes and shares help a lot too! Check out my full professional Photoshop training courses here: https://www.nucly.com/courses And all my asset packs here: https://www.nucly.com/tools — Follow me: Professional Training - https://www.nucly.com Blog - https://zevendesign.com Facebook - https://www.facebook.com/zevendesign Instagram - https://www.instagram.com/zevendesign 500px - https://500px.com/rikardrodin
Play Video
Play Video
29:13
Swan Ascent Photoshop Composite Part 1
Tutorial assets → https://www.nucly.com/swan-ascent-composite Full course here → https://www.nucly.com/grape-escape This project is one of the two live compositing lessons included in the Grape Escape course. Because each of these are almost an hour long, I've split it into two parts. In this first part, we set up the file, create and extend the background, add basic atmosphere and then do a cutout of our subject, including elements needed for the photo shoot but which we don't want in the final piece. Don’t forget to SUBSCRIBE and turn on notifications! And likes and shares help a lot too! Check out my full professional Photoshop training courses here: https://www.nucly.com/courses And all my asset packs here: https://www.nucly.com/tools — Follow me: Professional Training - https://www.nucly.com Blog - https://zevendesign.com Facebook - https://www.facebook.com/zevendesign Instagram - https://www.instagram.com/zevendesign 500px - https://500px.com/rikardrodin
Load More
Kelvin Designs
Play Video
Play Video
13:12
How to use Photoshop RAW Brushes
This Photoshop tutorial teaches you how to use Photoshop RAW Brushes in Adobe Camera Raw within Photoshop. First I'll show you how to install Photoshop Raw brushes, and then I'll walk you through the editing process. You can get my Photoshop Raw Brushes here: https://www.kelvindesigns.com/photoshop-raw-brushes
Play Video
Play Video
37:41
How to Create Composites in Photoshop - Cowboy
Download the files used in this tutorial here: https://www.kelvindesigns.com/how-to-create-a-composite-in-photoshop-cowboy In this tutorial, I'll show you how to create a composite in Photoshop with a cowboy. First I'll show you how to do a detailed extraction for maximum detail. Then we'll adjust with the colors so the subject and background match. Then we'll add some creative adjustments to make the whole thing stick together. To get the Compositor Workstation mentioned at the end of the tutorial, click here: https://www.creatorfoundry.com/composite-workstation If you want a specific tutorial for Photoshop, leave a comment and I'll be happy to make it.
Play Video
Play Video
01:06:31
How To Use Overlays in Photoshop
Download the overlays to follow along here: https://www.kelvindesigns.com/how-to-use-overlays In this Photoshop tutorial, I will teach you how to use overlays in Photoshop. We're going to build 4 Photoshop projects, starting with a very simple and easy composite using just one overlay and building toward more stunning effects with each project. You’ll learn how to use simple overlays in Photoshop, and how to manipulate them into more stunning effects. You’ll also learn how to use my Glow Actions and how to add shadow overlays in Photoshop using the new neural filters and displacement with depth maps. ----- Say hello: https://www.facebook.com/kelvindesigns/ 😎 https://www.instagram.com/kelvin.designs/ 📷 ----- 00:00:00 00:02:30 - Setting up your Photoshop workspace 00:03:05 - Photoshop Libraries 00:04:32 - Applying an Overlay 00:07:09 - Using Multiple Overlays 00:07:46 - Using Free Transform 00:08:25 - Removing Elements Using a Mask 00:12:27 - Selecting a Subject Using the Quick Select Tool 00:15:48 - Working in the Select & Mask Window 00:17:54 - Edit a Selection Using Quick Mask 00:23:52 - Why Use a Depth Map? 00:24:33 - Photoshop's Neural Filters 00:24:58 - Understanding the "Depth Blur" Filter 00:26:13 - Editing the Depth Map 00:29:37 - Saving a Depth Map for Use 00:31:00 - Applying a Depth Map to a Layer 00:36:36 - Colorizing an Image Using a Gradient Map 00:41:00 - Outlining a Subject 00:43:00 - Camera RAW Editing 00:44:05 - Revealing Elements Using a Mask 00:45:50 - Adding Smoke to an Image 00:46:55 - How and Why to Unlink a Mask 00:47:39 - Using Levels to Adjust a Layer 00:49:00 - A Cool Trick for Accentuating Mist or Smoke 00:49:38 - Adding a Light Ray to an Image 00:52:01 - Two Masks on One Layer? 00:53:23 - Adding a Glow Using Actions 00:56:52 - Hiding Elements Behind your Subject 00:58:31 - How and Why to Use a Clipping Mask
Play Video
Play Video
10:22
Top 12 Photography Apps for iPhone
Get the source files for this episode here: https://www.kelvindesigns.com/offers/WBBe2Fz9 1. Sol 2. Sun Seeker 3. Adobe Lightroom CC 4. Snapseed 5. VSCO 6. Mextures 7. Enlight 8. Filterstorm Neue 9. Camera+ 10. Lens Distortions 11. SKRWT 12. Afterfocus Here's my favorite iPhone apps for photographers and my basic workflow from shooting in RAW to retouching and publishing it to instagram!
Play Video
Play Video
07:51
Manual Mode Photography
Get the cheat-sheet and source files for this episode here: https://www.kelvindesigns.com/offers/Kjammjqc How to shoot in manual mode. Here's a crash course on how to use the "manual mode" on your camera! This will get you started on manual mode photography in just a few minutes. This tutorial will explain ISO, shutter speed and aperture so you can immediately start shooting in manual mode. Its easy, its fun, and the results are much better! Get the "Beginning Photography" course here: https://www.kelvindesigns.com/p/beginning-photography
Load More
bottom of page


![Flawlessly Remove Dark Eye Circles in Photoshop! [Pro Technique]](https://i.ytimg.com/vi/REt264jFvqE/maxresdefault.jpg)